 OK, so here goes: my very first tutorial! It’s taken a whole week to put together, so I hope it all makes sense. I’m (hopefully) going to show you how to create a multi-stranded crocheted wire necklace. Here we go...
You will need:
Tools
· A crochet hook. Any size will do – the bigger the hook, the bigger the loops that you will make in your necklace. For the one I’m going to show you, I’ve used a 3.5mm hook. But it’s entirely up to you!
· Wire cutters
· Long- or bent-nosed pliers
· Round-nosed pliers
Materials
· Coloured jewellery wire - here I’ve used .315mm wire, but any size up to .4mm should be fine. Any thicker and the wire will become more difficult to manipulate.
· A selection of beads in colours to match your wire. I have chosen semiprecious turquoise chips, f reshwater pearls, Chinese crystals and a selection of seed beads. You can use absolutely any beads you like – be creative! (You could even use buttons, washers or nuts if you wanted – anything with a hole in it will work).
· Two lengths of scrap .8mm wire – approximately 10-12cm each.
· Bead cones
· Jump rings
· A lobster-claw clasp.
Let’s get started!
Step 1:
Decide on the order you would like your beads to go in, and begin threading them onto your wire. I’ve chosen a uniform order for my beads, but these necklaces can look fab with the beads threaded randomly. Just be aware th at, if you have different-sized beads, you need to distribute them evenly over the different strands of your necklace.
Tip: always thread more beads on the wire than you think you will need for a single strand: between 50 and 100 is a good amount. You won’t have to use all of the beads you have threaded on the strand you are working on, but you won’t be able to add any more beads if you run out.
Tools
· A crochet hook. Any size will do – the bigger the hook, the bigger the loops that you will make in your necklace. For the one I’m going to show you, I’ve used a 3.5mm hook. But it’s entirely up to you!
· Wire cutters
· Long- or bent-nosed pliers
· Round-nosed pliers
Materials
· Coloured jewellery wire - here I’ve used .315mm wire, but any size up to .4mm should be fine. Any thicker and the wire will become more difficult to manipulate.
· A selection of beads in colours to match your wire. I have chosen semiprecious turquoise chips, f
 reshwater pearls, Chinese crystals and a selection of seed beads. You can use absolutely any beads you like – be creative! (You could even use buttons, washers or nuts if you wanted – anything with a hole in it will work).
· Two lengths of scrap .8mm wire – approximately 10-12cm each.
· Bead cones
· Jump rings
· A lobster-claw clasp.
Let’s get started!

Step 1:
Decide on the order you would like your beads to go in, and begin threading them onto your wire. I’ve chosen a uniform order for my beads, but these necklaces can look fab with the beads threaded randomly. Just be aware th
 at, if you have different-sized beads, you need to distribute them evenly over the different strands of your necklace.
Tip: always thread more beads on the wire than you think you will need for a single strand: between 50 and 100 is a good amount. You won’t have to use all of the beads you have threaded on the strand you are working on, but you won’t be able to add any more beads if you run out.

 Step 2:
Tie a knot in the end of your wire, leaving a tail of approximately 5-10cm. With normal crochet, you would use a slipknot, but with wire this does not matter so much. Slip the loop formed by the knot over the neck of your crochet hook.
Step 3:
Hold the short tail in your left hand and, using your right hand, wrap the working end of the wire once around the crochet hook, clockwise above the loop formed by the knot.

Note: I am right-handed, so these instructions are written with a right-handed person in mind. If you are left-handed, you might find it more comfortable to do things the other way around. Having said that; I know some right-handers who find it more comfortable to crochet the ‘left-handed’ way. Once you’ve got the hang of the technique, you’ll be able to adjust the wire in your hands so that it feels right for you.
Step 4:
With your right hand, move the crochet hook downwards and use it to pull the ‘top’ loop of wire (made with the working end of the wire) through the original loop (the one you made by tying the knot). Keep holding onto the tail with your left hand as you do this.

As you pull the wire downwards and through, you will see that a second loop is formed. Congratulations; you have just created your first stitch!


 Step 11:
Repeat steps 1-10 until you have as many strands as you like to complete your necklace. Here I have chosen to make a six-stranded necklace, but you can make however many you like.
 Step 12:
To create a necklace with your crocheted strands, you will need to join them together neatly. To do this on one side, take one of your lengths of scrap .8mm wire. Form a small loop in the wire, approximately one-third of the way along its length, using your round-nosed pliers. Bend this loop at a right-angle, so that the ‘base’ of the loop sits neatly on top of the longer section of wire.


 Step 16:
Thread the end of the .8mm wire through the bead cone, pulling the messy strand-ends inside.
Tip: If the wrapped strand ends are too big or bulky to fit inside your bead cone, you may want to spend some time with your flat-nosed pliers, ‘squashing’ them into shape!


With your right hand, move the crochet hook downwards and use it to pull the ‘top’ loop of wire (made with the working end of the wire) through the original loop (the one you made by tying the knot). Keep holding onto the tail with your left hand as you do this.


As you pull the wire downwards and through, you will see that a second loop is formed. Congratulations; you have just created your first stitch!
Step 5:
Slide the new loop downwards o n the neck of the crochet hook, and repeat steps 3 and 4 several times until you have a number of loops in a row. In crochet, this is known as chain stitch.
This part of your strand will form the back part of your necklace, where the clasp fastens behind your neck. Personally, I find it more comfortable to have no beads on this section, so I keep it ‘bare’. Whether or not you decide to do this is entirely up to you.
Tip: If you are going to bead a ‘bare’ section, don’t forget that you will need to have half of this on either side of your clasp at the back. Therefore, when you are beginning your strand here, you will need to stitch a ‘bare’ section that is half the length you require. You will stitch the other half when you are finishing off your strand.
 Step 6:
When you are ready to start adding beads, slide the first bead on your working length up the wire and hold it in place to the left of your crochet hook, BEFORE you wrap the working length clockwise around the hook to create your next stitch.
Slide the new loop downwards o
 n the neck of the crochet hook, and repeat steps 3 and 4 several times until you have a number of loops in a row. In crochet, this is known as chain stitch.
This part of your strand will form the back part of your necklace, where the clasp fastens behind your neck. Personally, I find it more comfortable to have no beads on this section, so I keep it ‘bare’. Whether or not you decide to do this is entirely up to you.
Tip: If you are going to bead a ‘bare’ section, don’t forget that you will need to have half of this on either side of your clasp at the back. Therefore, when you are beginning your strand here, you will need to stitch a ‘bare’ section that is half the length you require. You will stitch the other half when you are finishing off your strand.
 Step 6:
When you are ready to start adding beads, slide the first bead on your working length up the wire and hold it in place to the left of your crochet hook, BEFORE you wrap the working length clockwise around the hook to create your next stitch.

Step 7:
Pull the wire through the previous loop as normal, holding the bead in place with your left hand. You will see that the bead becomes ‘trapped’ in the new stitch you just made.
Pull the wire through the previous loop as normal, holding the bead in place with your left hand. You will see that the bead becomes ‘trapped’ in the new stitch you just made.

Step 8:
Continue to create stitches and add beads, according to your chosen design. You will have determined the order of your beads earlier, when you threaded them onto your wire. Here, I have chosen to stitch two ‘bare’ loops in-between each loop with a bead on it. You can choose to do whatever you like with your design.
Step 9:
If/when you would like to add a ‘group’ of beads in a single stitch, you can do this the same way as when you add a si ngle bead: simply slid
 e the required number of beads down the wire, and hold them all in place next to your crochet hook, before creating the next stitch. Here, I have added my smaller-sized seed beads in groups of three.
Step 9:
If/when you would like to add a ‘group’ of beads in a single stitch, you can do this the same way as when you add a si
 ngle bead: simply slid
 e the required number of beads down the wire, and hold them all in place next to your crochet hook, before creating the next stitch. Here, I have added my smaller-sized seed beads in groups of three.
Step 10: 
Continue with your chosen design until your strand reaches the length you would like for your necklace. Don’t forget to stop using beads near the end, and stitch a
‘blank’ section that mirrors the one on the other end.
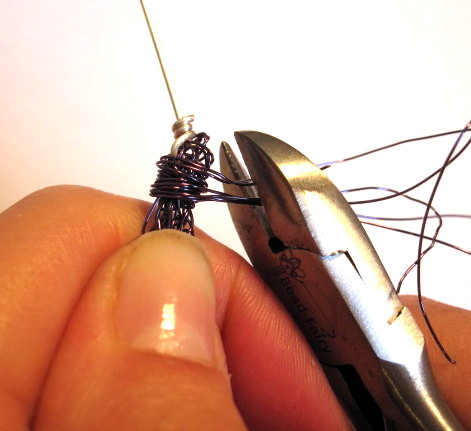
To finish off a strand, remove the crochet hook from the loop you just made and cut the working length with your wire cutters, leaving a tail of approximately 5-10cm. Thread the loose end through the loop you just made, and pull tight.
Note: Be very careful with your working length when you are removing the crochet hook. If you pull on the working length of wire before you have threaded it through the previous loop, this will cause your work to unravel.

Continue with your chosen design until your strand reaches the length you would like for your necklace. Don’t forget to stop using beads near the end, and stitch a
‘blank’ section that mirrors the one on the other end.
To finish off a strand, remove the crochet hook from the loop you just made and cut the working length with your wire
 cutters, leaving a tail of approximately 5-10cm. Thread the loose end through the loop you just made, and pull tight.
Note: Be very careful with your working length when you are removing the crochet hook. If you pull on the working length of wire before you have threaded it through the previous loop, this will cause your work to unravel.
 Step 11:
Repeat steps 1-10 until you have as many strands as you like to complete your necklace. Here I have chosen to make a six-stranded necklace, but you can make however many you like.
 Step 12:
To create a necklace with
 your crocheted strands, you will need to join them together neatly. To do this on one side, take one of your lengths of scrap .8mm wire. Form a small loop in the wire, approximately one-third of the way along its length, using your round-nosed pliers. Bend this loop at a right-angle, so that the ‘base’ of the loop sits neatly on top of the longer section of wire.
Step 13:
Take the one end from each of your crocheted strands and, holding the loose ends out of the way; thread them onto the loop you have made.
Take the one end from each of your crocheted strands and, holding the loose ends out of the way; thread them onto the loop you have made.

Step 14: Wrap the short end of the .8mm wire around the base of the loop once or twice, to secure the strands in place. Trim the .8mm wire.
Step 15:
Wrap the loose ends of your strands around the top of the ‘bare’ section once or twice, and then trim the ends.
Note: your wires will probably look quite messy at this stage. Don’t worry: the purpose of the bead cones is to hide these messy parts!


Step 15:
Wrap the loose ends of your strands around the top of the ‘bare’ section once or twice, and then trim the ends.
Note: your wires will probably look quite messy at this stage. Don’t worry: the purpose of the bead cones is to hide these messy parts!
 Step 16:
Thread the end of the .8mm wire through the bead cone, pulling the messy strand-ends inside.
Tip: If the wrapped strand ends are too big or bulky to fit inside your bead cone, you may want to spend some time with your flat-nosed pliers, ‘squashing’ them into shape!

Step 17:
Thread a bead or two onto the wire, and form another wrapped loop, as you did in stages 12 and 14.
Step 18: 
Repeat steps 12-17 for the other end of your necklace.
Step 19: Using jump rings, attach your clasp. If you would like, you can also attach an extension chain to the other side – or you can make your own extension chain out of jump rings, as I have done here.

Congratulations – your necklace is finished!
I hope you’re happy with the way it looks.
Please feel free to contact me with any comments or questions about this tutorial – any feedback is greatly appreciated! If this is well received, I’ll be creating another tutorial for a matching twisted-wire bracelet.
Happy beading!
This is so well written and JUST what I was looking for, thanks for sharing. X
ReplyDeleteFantastic Jilly - I'm so glad it's going to be useful! Thankyou for your lovely comment.
DeleteLet me know if you find it easy to follow in practice - I've never done this before! Also, I'd love it of you could post a picture of your finished necklace to my Facebook page - just follow the link at the top of the Blog!
Thanks again - and happy hooking!!! ;-)
I want to compliment you for offering such an informative and useful tutorial. I have been able to learn a lot of things by reading the post. Since you are fond of beads if you are looking for a unique set of fashion accessories and crystal jewellery then nothing can be better than Tresor Paris made of crystal beads and magnetite stones which is not only extremely beautiful but also supposed to have several health benefits. For further enquiry please log on to http://www.tresorparis.com
ReplyDeleteSome of the wedding rings found in the market, provided by the reputed ring manufacturers, look very majestic. Indeed, your wedding celebration should be a royal affair. Synchronizing with the mood of your wedding party, one should choose elegant wedding jewelries for the bride and bride groom. The ring is an integral part of one’s wedding jewelry. Tresor Paris provides exclusive Wedding Ring for your wedding occasion. All the rings are designed and manufactured with utmost care. Sometimes you will find the bride wearing junk jewelries on the day of the wedding. But the bride may feel uncomfortable wearing the junk jewelries. The Tresor Paris jewelries are light, which facilitate the brides with utmost comfort.
ReplyDeleteThe accessories which one wears should reflect the nature of that person. The Mens Ring from Tresor Paris reflects the nature of the men. The rings are very trendy and light. So, they are very comfortable to wear. The costs of the rings are very low, compared to their high quality. The rings are made of crystal and masculinity exudes from every part of the rings.
There are separate rings for men and women offered by Tresor Paris. The colors of the rings meant for women are feminine like pink, gold and many others, which will fill the heart of a lady with utmost satisfaction. The rings meant for men are made out of crystals which are of masculine colors. The color of the cord of the ring, on which the crystal is set, is black. Many rings have the symbol of Tresor Paris etched on them and this adds to the authenticity of the rings. The sizes of the balls of the rings are fairly significant. There is huge number of choices on the rings meant for both men’s as well women. You will be spoilt for choice, as far as the rings are concerned.
The rings, be it Wedding Ring or ring for men, are made by expert professionals. The website of Tresor Paris is very informative. You will be able to choose the rings, most suitable for you, from the catalog provided in the website and order online. The rings will be shipped to your house. You will also get a whole lot of news as far as rings are concerned, from the website. You will also get to know the phone number of Tresor Paris from the website. You will always remain updated about the stocks and the latest collections of the rings too, if you browse the website extensively. You will also come to know about breast cancer care rings, if you have a look at the website.
These days, celebrities are paying a lot of attention in wearing trendy rings, in an attempt to keep themselves updated with fashion. The celebrities are also engaging themselves in Tresor Paris rings, as they are able to highlight their character, with the help of the rings. The wedding rings are gaining in popularity among every stratum of the society, as the company provides you value for your money. So, you should wait no more and make your move to buy Tresor Paris rings.
Log on to the website of Tresor Paris, www.tresorparis.co.uk, if you want to grab hold of a Tresor Paris Wedding Ring for your wedding. The Mens Ring provided by this company is also of premium quality. The rings are quite fashionable or contemporary.
very nice blog.I actually enjoyed reading through this posting.Thanks for sharing Tressor Jewellery Shopping Online Hyderabad | Online Jewellery Shop India
ReplyDelete